
It's beginning to look a lot like Christmas.

Everywhere you go.. something something white with snow.... Okay, I don't know the rest of the lyrics.. >_< Anyway, I'm so excited; Christmas is less than 2 weeks away. If you haven't started your Christmas shopping then you better hop to it! And for all of those who have, it's time to start thinking about wrapping. So, I hope you found last week's tutorial helpful. I also hope you took my advice and saved some tissue paper cause today I have a super simple, but yet pretty wrapping tutorial that will fit the box we made here. May I add that it's very budget friendly- costs less than 30 cents to make. =)

Here's what you'll need:
-Tissue paper-3 sheets. if you have some lying around- great! If not, don't worry, you can get them at the dollar store! 30 sheets for $1.
-Double sided tape
-Ribbon
-Scissors
-Tag
Okay, let's get started--
Step 1: You'll need 3 sheets. 2 of the same color and 1 of a different color. Pick colors that compliment one another. I am using 2 light blues and 1 dark- kind of a tiffany blue color.

Step 2: Stack the tissue paper and cut them to size (to fit your box). Save the extra/scrap paper- we will use them again later. Here's the measurements to fit the box we made 2 weeks ago- see box here.

Step 3: Now lay the box on top the tissue paper; situated more to the left side of the paper.

Step 4: Start wrapping as you normally would. Pull the left side to the middle of the box and tape it to the box. Picture #1
Now pull the right side over. Make sure it covers the whole top. See picture #2. Do not tape.
 |
| Picture #1 |
 |
| Picture #2 |
Step 5: Turn the box horizontally. Fold the paper down as if you were going to fold a paper fan. The fold is 7/8" wide (horizontal).

Step 6: Fold again and then again; 3 folds total. Tape the tissue to the box after the 3rd fold. See picture #2. Make sure the tape is not showing-placing it underneath the paper is the best option.
(This is where my camera went haywire.... Sorry for the picture quality!)
 | |
| 2nd fold |
 |
| 3rd fold- should land in the middle- put tape where indicated |
Step 7: Fold and tape down the sides as you normally would...

End result:

You can leave it like this... or continue to step8
Step 8: Take the extra scrap piece (lighter color) and make three folds-- fold should be 7/8" wide, 13 and 1/2- 14" long. .

Step 9: Place the piece you just made on the box as shown in picture. Wrap around to back and tape the pieces together. This creates the T- shape on the front side of the box.

Step 10: Now all that's left to do is: decorate...
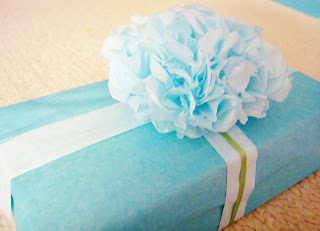
And the pom pom we made last week, as seen here, comes in handy too!
So what do you think? Easy, right?
Super fun - almost ready to get to wrapping my gifts so this helps!
ReplyDeleteyour posts are always helpful. thanks.
ReplyDeleteand the pictures are good :)))
http://excurlythoughts.blogspot.com/
Such a nice post, I enjoyed it a lot! Wonderful!
ReplyDeleteTake a look and if you want we can follow each others: Cosa mi metto???
Nice post and very thoughtful.
ReplyDeletePeace and Happiness to ALL !
I love your blog. Oh by! You just reminded me of the ton of presents I have to wrap yet!
ReplyDeleteAw, thank you. You guys are too sweet!! I am glad you find my tutorials helpful! =)
ReplyDeleteAnyway, there's only 8 days left til Christmas. Can you believe that? Time is just flying! So you better hop to it; wrapping I mean. hehe. By the way I would love to see how your wrapping turns out! Happy Holidays
@Fab and himilbeauty- thank you for following. I am now following you both- Great blogs you both have as well =)
please check my surprise for you
ReplyDeletehttp://excurlythoughts.blogspot.com/
Great tutorial! Very cute and festive.
ReplyDeleteBeautiful!!! Love the wrapping!!!
ReplyDeleteVisiting you from Etsy blog team!
Pei Li
very cute tutorial. I really like the look of it. I am going to have to use it next year as I am all wrapped up for this year.
ReplyDeleteI am going to Facebook this on my page.
@just me- you are too sweet! Thank you. And congrats on your award. You deserve it! I love your blog.
ReplyDelete@Sher and miniature- Thank you =)
@Joellen- Thank you for commenting and following.
@E hall- Aw, thanks!
Cute wrapping! Looks great (and your pictures turned out just fine). =0)
ReplyDelete~Kim
from Blogging Buddies
love it!!!! and love your blog
ReplyDeletefantastic tutorial honey! thanks! I'm following
ReplyDeleteCheck my blog and follow me if you like :)
xx
www.sickbytrend.com